CSE5910 : Multimedia Programming in Java
Lecture : Graphical User Interface Programming
In the previous lecture:
- Five major attributes of sound: pitch; timbre; loudness; attack/decay (envelope) and duration.
- Digital sound is an encoding of analgoue air-pressure waves at a certain sampling frequency.
- Sound may be used to improve a user interface but it may also annoy a user if used inappropriately.
In this lecture:
- How do we layout user interface elements within a Java program's GUI?
- How do we work with labels, text fields, buttons and other UI elements?
- How do we set up an event handler to respond to user generated interaction?
One possible introduction to basic Java UIs: Deitel & Deitel, "Java How to Program", 3rd edition, Prentice Hall 1999 chapter 12.
Introduction to Java GUIs
Most software graphical user interfaces (GUIs) these days are built from standard elements called widgets (window gadgets).
These include in Java...
...as well as numerous other elements (menus, sliders, password entry boxes etc.) that you've encountered in your daily use of application software.
and the JPanel has the following ancestry:
java.lang.Object -> java.awt.Component -> java.awt.Container -> javax.swing.JComponent -> javax.swing.JPanel
So you can see that both the JFrame and JPanel are Containers. This means that we can lay out their contents using Java's Layout Managers.
A Layout Manager defines a high-level mechanism for controlling the position of GUI elements within a container that is much easier to use than specifying the exact x and y coordinates of every element.
The layout managers include:
| FlowLayout |
Components placed left to right in the order they are added to the container.
Components may be left or right aligned or centered. When the container edge is reached components spill onto the next line. |
Default layout for JPanels |
| BorderLayout |
Components placed into five regions at North, East, South, West and Center. |
Default layout for JFrames |
| GridLayout |
Components placed in rows and columns. |
|
FlowLayout sample code
import java.awt.*;
import java.awt.event.*;
import javax.swing.*;
public class FlowLayoutTest extends JFrame
{
private JButton leftBut, centerBut, rightBut;
private Container c;
private FlowLayout layout;
public FlowLayoutTest()
{
super ("Flow Layout");
layout = new FlowLayout(); // Make a new FlowLayout object
c = getContentPane(); // Easy way to get space within the JFrame that won't overlap the title bar
c.setLayout(layout); // Set the container's layout
leftBut = new JButton ("Left");
centerBut = new JButton ("Center");
rightBut = new JButton ("Right");
c.add(leftBut); // Add the three buttons in left to right order...
c.add(centerBut);
c.add(rightBut);
}
public static void main (String args[])
{
FlowLayoutTest app = new FlowLayoutTest();
app.addWindowListener( new WindowAdapter(){ public void windowClosing(WindowEvent e) { System.exit(0); } } );
app.setSize (300,75);
app.setVisible(true);
}
} |
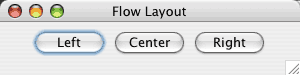 |
Here's the result. Type the code in yourselves and see what it does when you manually shrink the window.
Note that the buttons don't do anything yet because we haven't written any event handlers for them. This is discussed in the section below, Handling Events. |
Handling Events
Events are generated by a user interacting with the GUI by operating an interaction device such as the mouse or keyboard. (Events may also be generated by the software itself but we shall focus on user-generated events here).
Information about the kind of event that a user's actions have caused is stored in an object of a class that extends AWTEvent. These are contained in the package java.awt.event and are used even for Swing components. Swing does define some additional event types within javax.swing.event.
AWTEvents include: ActionEvent, AdjustmentEvent, ItemEvent and ComponentEvent.
ComponentEvents include: ContainerEvent, FocusEvent, PaintEvent, WindowEvent and InputEvent (either KeyEvent or MouseEvent).
To process events, a programmer must register an event listener and implement an event handler.
An event listener is an object of a class that implements at least one of the event listener interfaces from java.awt.event and javax.swing.event. (The ActionListener interface is one we have seen above in the Border Layout and Button Event Handler Sample Code. Others include the WindowListener used in many examples already, KeyListener, MouseListener etc.).
The event listener interface requires that event handlers be written to handle one or more specific events (depending on the type of listener it is) generated by the program.
An event handler is software that receives an event and executes some code to respond to it. For instance when a button is clicked an event is generated. Code must be executed to do something (such as save a file, decrement a counter, redraw the screen etc.) depending on that button's intended function.
Border Layout and Button Event Handler Sample Code
import [...] public class BorderLayoutTest extends JFrame implements ActionListener
{
private JButton buttons[];
private String names[] = {"Hide North", "Hide South", "Hide East", "Hide West", "Hide Center"};
private Container c;
private BorderLayout layout;
public BorderLayoutTest()
{
super ("Border Layout");
// Variables to specify the amount of space between the layout's regions
int horizGapWidth=5, vertGapWidth=5;
layout = new BorderLayout(horizGapWidth, vertGapWidth);
c = getContentPane();
c.setLayout(layout);
buttons = new JButton[names.length];
for (int b=0; b<names.length; b++)
{
buttons[b] = new JButton (names[b]);
buttons[b].addActionListener(this);
}
// The order we add the buttons doesn;t matter for a border layout
// because we explicitly specify the lcoation in which each is added.
c.add(buttons[0], BorderLayout.NORTH);
c.add(buttons[1], BorderLayout.SOUTH);
c.add(buttons[2], BorderLayout.EAST);
c.add(buttons[3], BorderLayout.WEST);
c.add(buttons[4], BorderLayout.CENTER);
}
public void actionPerformed (ActionEvent e)
{
for (int b=0; b<buttons.length; b++)
{
if (e.getSource() == buttons[b]) { buttons[b].setVisible(false); }
else { buttons[b].setVisible(true); }
layout.layoutContainer( getContentPane() );
}
}
public static void main (String args[])
{
BorderLayoutTest app = new BorderLayoutTest();
app.addWindowListener( new WindowAdapter() { public void windowClosing(WindowEvent e) { System.exit(0); } } );
app.setSize (300,200);
app.setVisible(true);
}
} |
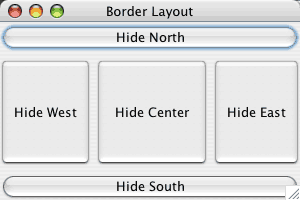 |
Here's the result. Type the code in yourselves. See what it does when you manually shrink the window or click on the buttons.
Now the buttons do something because we have attached an event handler to them. In this case we hide the button that has been clicked and show all the other buttons in our button array. Of course your program can do something much more interesting.
Note that our class implements the ActionListener interface. It provides a method actionPerformed() that catches the events of the buttons and does something in response. |
| Homework: |
Experiment with Java's GridLayout. Read up on how it works and write a simple test program like those above to demonstrate its features. |
More Complex UI Arrangements
Often we don't want to be restricted to Java's simple layouts for our entire window. To make things more interesting, we can build sets of nested Containers using JPanels.
import [...] public class ComplexLayoutTest extends JFrame
{
private JButton buttons[];
private JPanel buttonPanel;
public ComplexLayoutTest()
{
super ("Complex Layout with Panels");
Container c;
BorderLayout layout;
int horizGapWidth=5, vertGapWidth=5;
buttons = new JButton[3];
buttonPanel = new JPanel();
layout = new BorderLayout(horizGapWidth, vertGapWidth);
c = getContentPane();
c.setLayout(layout);
c.setBackground(Color.blue); // Set the background colour of this container
buttonPanel.setLayout( new FlowLayout() );
for (int b=0; b<3; b++)
{
buttons[b] = new JButton ("button " + (b+1));
buttonPanel.add(buttons[b]);
}
c.add(buttonPanel, BorderLayout.SOUTH); // Add the JPanel to the South region of the container
}
public static void main (String args[])
{
ComplexLayoutTest app = new ComplexLayoutTest();
app.addWindowListener( new WindowAdapter() { public void windowClosing(WindowEvent e) { System.exit(0); } } );
app.setSize (300,200);
app.setVisible(true);
}
} |
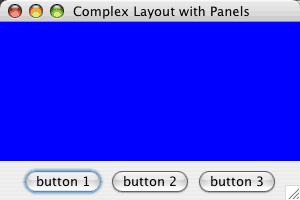 |
Here's the result. Type the code in yourselves and play around with the possibilities.
The JPanel sits within the South region of the BorderLayout that we have created. Its buttons are arranged using a FlowLayout. In this way we can create all kinds of useful layouts.
Note that the main container has been coloured blue. |
Neater Event Handling, JLabel, JTextField and JPasswordField
In the Button event handling example above we wrote a class that extended the BorderLayout test (extends JFrame) and the event handling (implements ActionListener). This is not the most sensible way to actually build our classes. A more sensible alternative is to define an inner class for handling the events.
import [...] public class LabelTest extends JFrame
{
private JLabel labelI, labelN, labelO;
private JTextField text;
private JPasswordField pass;
private Container c; public LabelTest()
{
super ("Events, Labels and Text Entry"); c = getContentPane();
c.setLayout(new FlowLayout());
c.setBackground(Color.white);
// You can make labels with text and icons...
Icon tent = new ImageIcon("Tent.GIF");
labelI = new JLabel("A tent label with icon", tent, SwingConstants.LEFT);
labelI.setToolTipText("A tent tool tip");
// You can make labels with just text...
labelN = new JLabel("A house label with no icon");
labelN.setToolTipText("A house tool tip");
// You make labels without passing parameters to the constructor...
labelO = new JLabel();
Icon tree = new ImageIcon("Tree.GIF");
labelO.setIcon(tree);
labelO.setText("A tree label with icon and text beneath");
labelO.setToolTipText("A tree tool tip");
labelO.setHorizontalTextPosition(SwingConstants.CENTER);
labelO.setVerticalTextPosition(SwingConstants.BOTTOM);
// You can build text and password fields with default text and of a specific size...
text = new JTextField("Default text", 10);
pass = new JPasswordField("Hidden", 5);
// Set up an event handler to deal with the text entry boxes (see code below)
TextFieldEventHandler handler = new TextFieldEventHandler();
// Register the event handler for the text and pass GUI elements
text.addActionListener(handler);
pass.addActionListener(handler);
// Add all of these to the JFrame...
c.add(labelI); c.add(labelN); c.add(labelO);
c.add(text); c.add(pass);
}
public static void main (String args[])
{
LabelTest app = new LabelTest();
app.addWindowListener( new WindowAdapter() { public void windowClosing(WindowEvent e) { System.exit(0); } } );
app.setSize (300,200);
app.setVisible(true);
}
// The (inner) class for handling the events
private class TextFieldEventHandler implements ActionListener
{
public void actionPerformed (ActionEvent e)
{
String s = "";
// Determine what caused this event (returns a Component reference)
if (e.getSource() == text)
{
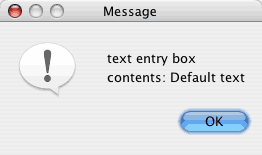
s = "text entry box contents: " + e.getActionCommand();
}
else // if (e.getSource() == pass)
{
// Cast the Component ref. to a JPasswordField so that...
JPasswordField pwd = (JPasswordField) e.getSource();
// ...we can use its getPassword() method to extract the password
s = "password entry box contents: " + new String( pwd.getPassword() );
}
JOptionPane.showMessageDialog(null, s);
}
}
} |
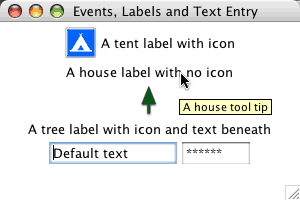 |
Here's the result. Type it in and run it to see the event handler in action when you enter text into a box and hit <Return>
The first label has both an icon and text. The second just text. The third has an icon and the text is beneath it.
Note the tool tip that becomes visible when you move the mouse over the label.
|
 |
More details on event handling
Every JComponent has an instance variable listenerList which is an object of class EventListenerList.
The listenerList stores all of the listeners that have been added to the JComponent.
When the program above executes text.addActionListener(handler) a new entry is added to text's listenerList that includes the reference to the handler object and the type of listener, in this instance an ActionListener.
When the text object receives an event, the listenerList is examined to see if any event handlers have been registered to handle it. If so, then the event is passed to the handlers for processing. If not, the event is missed.
Lecture summary:
- Java provides Layout Managers for placing UI elements within windows.
- JPanels may be used within other containers (including more JPanels) to build complex widget arrangements.
- Software may implement Java interfaces for handling events generated by user interaction with widgets.
- Some basic widgets include buttons, labels, text and password fields.