

An open source,
cross-platform, OpenGL tutor.
| home | screenshots | documentation | download |
| home > documentation > main window |
Main Window
Below is a screenshot of Glitch. Click on one of the circled numbers to find out more about a given part of the main window.
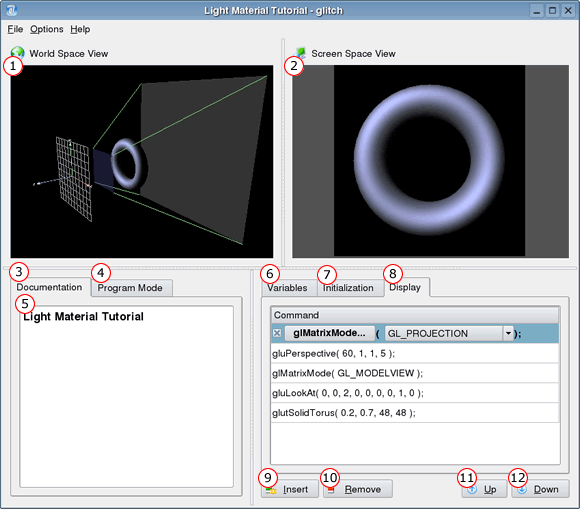
1. World Space Viewer
Provides more insight on the scene, as it enables you to visually
observe the projection frustum and to interact with it, so
that you can see the scene from a different angle
Please see World
Space Viewer for more details.
2. Screen Space Viewer
Displays the direct scene output, exactly as you would see
it if you had written and compiled the program yourself.
3. Documentation Tab
This tab contains the Documentation
Browser.
4. Program Mode Tab
This tab enables you to change the program mode into step mode,
and provides the controls and feedback information to go with it.
Please see Step Mode
for more details.
5. Documentation Browser
This browser contains rich-text, which is used to provide instructions
or other information to the user. This text belongs to the current project
and may be modified via the project properties dialog, which can be found
by clicking File -> Properties...
Please see Project
Properties for more details.
6. Variables Instances
This tab contains a table of variable instances that are in
use by the commands in the initialization and display sections. Hence,
they are created and destroyed automatically when the commands that own
them are themselves created and destroyed.
The variables can be selected and modified here. Though, to edit the name
of a variable, you will need to locate the actual command that uses it
and then edit the name where it is given as a parameter. The variable
instance table will be updated to reflect any changes.
Note that the insert, remove,
up and down
command manipulator button will all be disabled when this tab page
is selected.
7. Initialization Commands
This tab contains a table of commands that are to be executed
in the initialization section of the OpenGL scene, such as glEnable calls.
Commands can be inserted,
removed, moved
up, moved down
or manipulated.
Once a command has been selected, it can be manipulated. The command can
be enabled / disabled, by checking / un-checking the check box that appears
at the front of the command. The function that the command is representing
can be changed by clicking on the button that is labeled with current
function's name (e.g. "glMatrixMode...") and then choosing a
different one from the hierarchical list that will pop-up. The parameters
may also be edited here.
The OpenGL scene viewers will be updated instantly when any modifications
are made.
If the command requires any variable instances, then it / they will be
created automatically.
Please see Variable Instances
(above) for more details.
8. Display Commands
This tab contains a table of commands that are to be executed
in the display section of the OpenGL scene, such as those which actually
draw the scene.
Please see Initialization Commands
(above) for more details.
The commands in this section can be stepped through, one-by-one, similar
in behavior to a debugger. Please see Step
Mode for more details.
9. Insert Command Button
Insert a new command into either the initialization or display
table, which ever is selected.
It will be inserted directly below the currently selected row, where one
already exists.
If the new command requires any variable instances, then it / they will
be created automatically.
10. Remove Command Button
Remove the currently selected command from either the initialization
or display table, which ever is selected.
If the command used any variable instances, then it / they will be destroyed
automatically.
11. Move Command Up Button
Move the currently selected command up, if possible.
12. Move Command Down Button
Move the currently selected command down, if possible.
Last Updated: March 4, 2004